

The beginning of the school year is a time full of many new things: new teachers, classes, friends, and even schools. For music students, it can also be a time of dusting off the instrument, or learning new skills for the first time. Here are some basic tips for setting up new cellists and bassists for success and for refreshing the skills of returning students.
Starting First-Year Students Right
Be a Tree
Without guidance, many cello and bass students will revert to a slouched posture with casual, crossed feet. Not only does it look unprofessional to sit or stand in such a manner, it also affects the quality of playing. I share with students that they are like strong trees when they are playing their cello or bass: their feet are roots that are spread out and firmly planted in the ground in front of them; their legs and torso are the straight, tall trunk; and their arms are branches.
Cellists should sit on the edge of their chair with their feet placed far apart enough that the corner edges of the lower bout of the cello touch the insides of their legs. Bassists should stand tall and rest the bass on their body so that it can lean on them without falling.
I have found the videos and writing from Discover Double Bass to be useful when talking about bass setup.
Milkshake Hand
Once students have the posture down, it is time to move onto the left hand! The “milkshake hand” is a term I heard from a fellow cello teacher. When students sit behind the cello or bass, have them hold up their left hand is if they are holding a milkshake, soda can, or glass of water (I often ask my student his or her favorite drink and use that as my example). Students should have rounded fingers, including the thumb, and they should have spaces in between each finger. Explain that when playing, this milkshake hand remains that way when placed on their instrument.
 Have the student place his or her hand with rounded, tall fingers on the fingerboard, with their thumb behind the second finger (the middle finger) on the back of the neck. This relationship between second finger and thumb is very important- I tell my students that thumb and second finger are travel buddies– they go everywhere together.
Make up a game where students make their milkshake hand, put it on the bass or cello, check it, and take it away to do it again. Students may want to play with flat fingers when pressing into the string, so remind them to keep their rounded milkshake shape while using gravity to push into the string with their finger tips.
The String Pedagogy Notebook has some great content on the cello left hand.
Chicken Wing
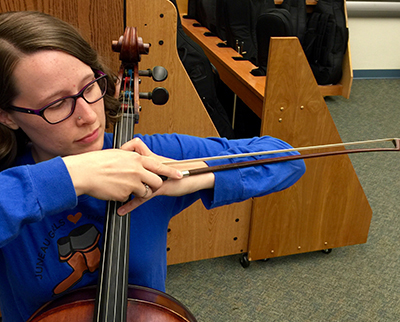 One way a player can keep their tall fingers while playing with their left hand is by keeping their elbow up. I refer to this concept as the “chicken wing” with my students. I ask them to imagine a chicken trying to lift its wings to get airborne. The natural tendency will be to have low elbows (especially in the left arm) when playing the cello or bass, so remind students to keep their chicken wing up. A good way to check is to have students lay their bow across their left hand and arm. If the bow lays flat and touches every part of the hand and arm, the elbow is high enough. If the elbow is too high or low, the bow will not lay flat on every part of the hand and arm. It will take endurance and muscle to keep that elbow up, so allow students to rest their arms when needed.
The Flop Bow Hold
 It may not feel like it when first starting out, but in my opinion, playing the cello and bass uses many natural motions. Emphasize to students that playing their instrument is much like being a ballet dancer- every movement should be relaxed and graceful, using only the muscles necessary.
After having students play pizzicato for a while, it will come time to introduce the bow. The first thing I have students do is “flop” out their hand, which is just a slight shake in front of them. When their hand has stilled and their palm is facing down and their wrist is bent, I show students that their hand tends to naturally have spaces in between the fingers with a slight bend to them. By placing the bow under those bottom knuckles of the hand and bringing the thumb to where the stick meets the frog, you can show students how simple the bow hold is.

The trick, though, is maintaining that hold. Students need to feel the stick under the their fingers and push into the bow with the weight of their arm while keeping tall, long fingers. Allow students to practice setting their bow holds up by themselves and playing open strings.
The key is to keep them repeating this practice and being aware of when they need to readjust their grip so their muscles remember it correctly.
Additional details can be found on the Artist Works blog as well as from Music Right from the Start.
Help More Advanced Students Brush Off the Rust
Embrace the Stretches
Even though playing the bass and cello can feel natural once someone gets the hang of it, it will still feel completely foreign when picking it back up after a long summer. It is always important to approach the instrument with relaxed and warmed up muscles, so stretches become a very important habit for any string player. Have students do shoulder rolls, both with their arms at their side and moving in circles above their head, finger flexes, and any other stretches that will help them get those muscles ready to go. Students should do these stretches before playing and after, if possible.
For more examples of stretches, check out this resource from the MusicNotes blog.
Open Strings Are Our Friend
Before jumping into trying to master the next solo piece or methods book exercise, students should focus on re-learning how to find a beautiful sound with their instrument. Have your cellists and bassists practice the bow hold they learned when they began and play long, open strings. The focus should be on practicing good bow technique while creating a nice, core tone on the instrument with a relaxed opening and closing of the bow arm. The key is to concentrate on using the weight of the shoulder blade to create the sound with the bow, allowing that weight to transfer down the arm and sink into the string- all while keeping an elbow that is higher than the wrist. This way of thinking will avoid unpleasant sounds and injuries related to squeezing the bow into the string in attempts of making a big sound.
Practice Those Scales
Once students have warmed up to their tone, incorporate the left hand by playing a scale, starting off slowly and progressing to playing it faster. The student should choose one scale key to work on each day or week and start by playing whole notes (the quarter note equaling 100-120 is usually what my students do), then half notes, then quarter notes- playing one whole note per bow, then two half notes per bow, and four quarter notes. This allows the cellist or bassist to focus on intonation and coordination between the two hands. Students are encouraged to redo the scale at any point, listening for accuracy.
Peer Mentorship
It is not always easy to have students that are at different playing levels in the same ensemble. This is the perfect time, though, to build in peer mentorship. Allow the more advanced students to become teachers to their less experienced peers. As long as those students have a solid foundation for their own technique, they can be a great resource to cello and bass players who are just starting out.


